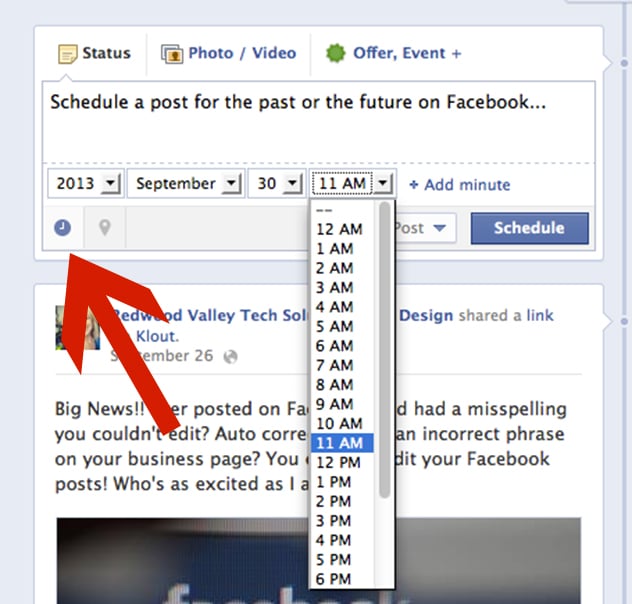
If you want the ability to schedule posts on Facebook, using Facebook tagging, uploading and other features, simply use the Facebook Scheduler that is available right within your status update box.
 Schedule a Facebook Post
1. Create your Facebook post as you normally would by adding links, tagging business pages, adding photos, videos, etc. Don’t click “Post” yet.
2. Now schedule your post by using the little clock icon on the bottom left corner of the status box. Once you click on the calendar an option appears to select the year, then the month, day, hour and minutes as show in the image here..
3. Once you have selected the date and time, simply click the blue Schedule button and your post will appear when it is scheduled. Remember to check back or watch your notifications after your post is on your page!
Backdate Posts on your Timeline
You may have also noticed the option to choose a date and time in the past. You can back date posts to appear on your timeline in the past as well! You can even check the box so that your post does not appear in the news feed (if you don’t want fans to see old information as you post it in the present time).
If you need to post an event from the past on your timeline, a better option to might be to use the Milestone feature instead.
Edit a Scheduled Post
You can find your scheduled posts to change the time, post the update now, or cancel the scheduled post so it does not appear. To find your scheduled posts, find the Activity Log on your page. You can find the Activity Log on your business page by using the Admin Panel and going to the Edit Page, Use Activity Log Menu.
Features Not Available when Scheduling Posts
It’s also important to note that if you automatically update your Twitter account with your Facebook posts, a schedule post will not be published to Twitter. Other features not available to schedule as a post include a photo gallery, offer, event or milestone.
Do you current schedule Facebook posts? Do you think this feature will be helpful if not?


