Updated February 15, 2018
Wondering why you would optimize images for the web? There are many reasons why you should optimize images on your website!
 Taking the time to do a few extra steps when adding photos and graphics your web pages and blog posts will make a big impact, not only for your visitors, but with search engines such as Google and Bing as well as Social Networks like Pinterest.
Have you ever visited a webpage or blog and had the pleasure of watching a photo load, line by line, taking several seconds until you get to see the full image? Don’t let this be your website!
Optimizing images will direct more search engine traffic to your site and please your visitors by decreasing the amount of time it takes for your website to load. Let’s get started!
Resize Images
NOTE: Your website may offer the ability to resize and compress your images right on upload. If you’re not sure on this – ask us!
No matter how gorgeous your images are, your customers won’t appreciate waiting for them to load. Don’t test their patience!
Not surprisingly, 47% of consumer expect a page to load in 2 seconds or less and 40% of visitors abandon a webpage that takes more than 3 seconds to load, according to EduBirdie.
We chose to resize our images before adding them to our WordPress websites to ensure a good quality photo at a fast paced load time.
Resizing an image is simple.
There are several image optimization tools online that you can research. In this article we are going to teach you how to use Pixlr.com, a simple, free online photo tool. We’re Photoshop fans but any image editor like Pixlr.com will work! Follow these steps to resize your images:
- Go to www.pixlr.com.
- Scroll down to ‘Pixlr Editor’ and choose ‘Launch Web App’.
- Find the photo on your computer and click ‘Open’.
- To resize the image, go to the Image menu>Image size.
- Choose the dimensions for your photo depending on your specific website (ask your website designer if needed). Generally, these specification are common:
- 800 pixels or less wide for a full width photo or
- 400 pixels wide for half page photos
- Make sure you keep the check box next to “Constrain Proportions” checked. Click Ok.
- Go to File>Save – Save the photo with a name that is descriptive of what the image is, using important key words that people may be searching for (e.g. optimize-images-for-wordpress.jpg). Save to your computer and choose image quality of 60-80. Click Ok.
- Take your image optimization one step further and use this handy tool to compress your images as well. https://optimizilla.com/
Upload your image (or bulk images), the tool will compress the image without losing quality, then download the images to use within your website. If you’d like the option to complete this process right in your website, contact us and we’ll get it set up for you!
Optimize Images For SEO Search Engines & Social Media
Search Engine Optimization (SEO) is important for every website, and photos are no exception. Taking a few minutes to follow a couple of extra steps when uploading photos will pay off in the long run by helping to optimize your images for search engines and directing more traffic to your site.
 Optimizing your images for search in WordPress:
- Resize the photo (see above).
- Save your photo with a name that contains the keywords that describe your image (not IMG34425.jpg).
- Place your cursor in the body of the text where you would like the photo to go.
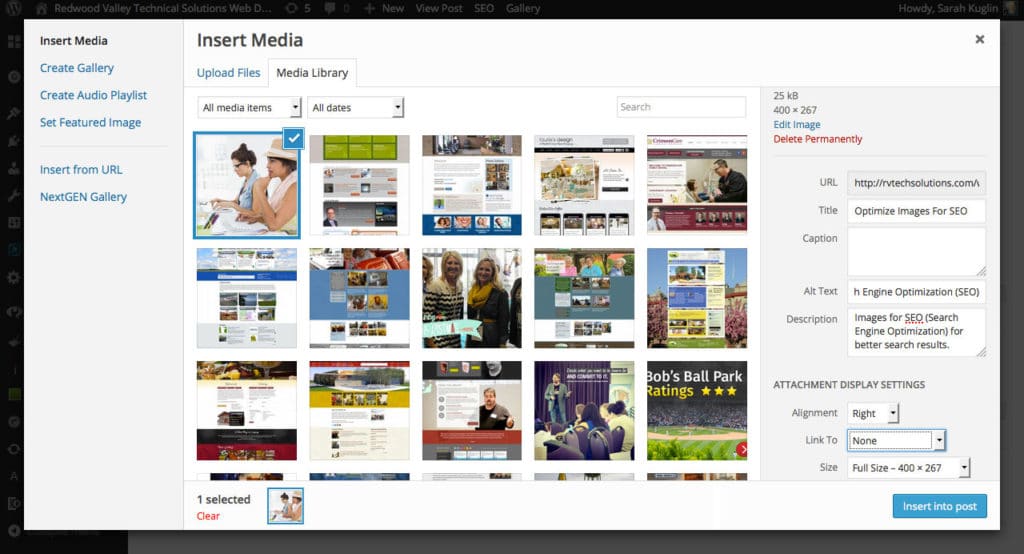
- Click on the ‘Add Media’ button. Select the ‘Upload Files’ tab to upload a new image or choose from your existing media library.
- Click ‘Select Files’ or drag a photo on the box, and choose the photo from your computer.
- On the right side of the window, fill in these important areas:
- Title – describe your image using key words and terms. Should be readable for search engines, and accessibility software.
- Caption – appears in a box directly below your photo that all of your website visitors will see (use as needed).
- Alt Text – similar to the title but specifically read by search engines. Use descriptive keywords about your photo here. We like to think, if the image did not appear, does the alt text describe it well?
- Description – this too is beneficial for search engines and does not appear on the web page. Use descriptive keywords and phrases about your photo here as well.
- Select alignment – Choose “None” to align the photo in the center of the page with text underneath it. Most of our web page photos are aligned Right, with text to the left. Left alignment and center are also an option.
- Go to the ‘Link To’ drop down menu. Choose ‘None’ unless you want the image to be clickable and link to the image itself, another website page or other document. (see directions below)
- Click ‘Insert Into Page’ button to complete photo insert.
BONUS – Adding full titles and descriptions to your photos is beneficial for social media sharing purposes too, especially Pinterest! When someone takes the time to pin or post your blog/page you want to take full advantage by writing descriptive, keyword rich text to share.
Add A Link
Linking an image is a great way to encourage additional customer interaction on a page or post. Website visitors can click on the image to get more information; giving you the opportunity to send them to another page on your site. You can also link to an external URL when appropriate, but be sure to direct the link to open in a new tab.
Create an image link, follow these steps:
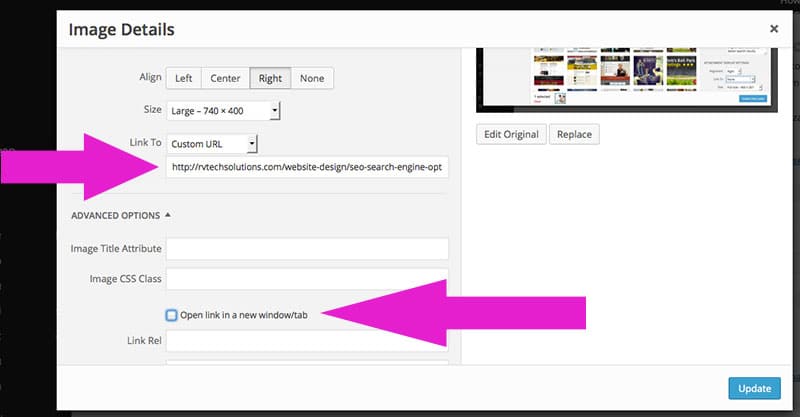
- Click on the image that you inserted into a page or post.
- Select the ‘Edit’ icon which looks like a pencil.
- Go to the ‘Link to’ drop down menu.
- Select ‘Custom URL’.
- Type or Paste the URL into the field, making sure you have “https://” in front of www.
- Click the ‘Advanced Option’ section drop down arrow if you are linking to an external URL (a different website) and check the ‘Open link in a new window/tab’ checkbox.
- Click ‘Update’ button.
Onward & Upward
Now you know the importance of image optimization and what steps are necessary to optimize the images on your site. Don’t wait! Start optimizing your photos today! Then watch as your website traffic increases and your bounce rate decreases!
Remember that you can visit the Manuals’ section located in the left sidebar of your WordPress dashboard to watch instructional videos on inserting photos into your website and other topics too. Happy optimizing!
Do you optimize photos on your website? What results have you noticed?


